Hello there,
"It does not matter how slowly you go as long as you do not stop." – Confucius
Today, it's a big day for this post and me. I am resonating with this quote a lot (ofcourse that's why I used it), but to be honest, ALTENEW EDUCATOR JOURNEY was a long time pending task in my bucket list for last few years and even after being selected, was late to start the process. But it's the first step which are the hardest and I couldn't agree to it more. Took that leap of faith finally and here we are, with my post for the Level 1 challenge submission.
It was a nice journey untill here and wish to continue further and work more towards the final goal, as I guess everyone else feel same when they take this challenge journey.
There were some guideline to follow along in this challenge and I will explain all the steps in details of what, hows and whys. Please give me grace throughout this post (As it will be a long one and photo heavy too!!) and let's begin :)
I have chosen few components from the classes I took in Level 1 and you will see throughout this post the mix of all those techniques in every project: Clean and simple boutique cards, Easy die cutting technique, Easy ink blending technique.
All of the techniques shown in all the level 1 classes are used actually, but on a high level, these will be the most higlighted ones on all the projects majorly.
Complete projects in 1 frame (all his and hers card sets + packaging box together):
His set:
Hers set:
Only the gift sets (cover or packaging together):
How to details (for both the gift sets):
I chose to keep the box simple and hence I have made them with acetate sheet, because I like the smart look they give from all sides and also the peek into the cards your receipient will be receiving.
The measurements to make the acetate box are as follows:
Cut the acetate sheet to the size: 7-3/4th by 10-1/2".
Scoring needs to be done at 10-1/2" side as follows: 1/2", 1", 5-1/2", 6" and then turn it around and do the scoring on 1/2" (this will make the bottom part of the box). Next scoring at 6-1/4" and 6-3/4" (This will make the lid part).
Then, it will be simple folding along the score lines and adding the double sides tape to finish joining the box.- To create layers, always try to use paper layers than foam tape (Specially shaker and multi die cuts projects)
- Paper layers can be made using the waste papers like stamp backing paper, even the carboard in which the packages come
- Ink blending can be done also using multiple colorful paper strips (it gives highlight to the projects and also not always inks need to be used)
- One layer cards are very simple, if you can ideate them and think them through on rough sketches first. This eases the work for final project and also looks crisp and clean, less mistakes.
- Planning is an imp part to cover all the points asked for in the challenge, so we dont miss any.
- Sometimes colord cardstock are your best friend, as they help ink blending less manual than on white cardstock. Also they are good for the color play with stamps, as they give base color to your projects already, even in CAS creations.
- Play around with sentiments like they not always needs to be in rectangle format. You can keep them in oval or circle shape too.
- Its important to play wit the landscape and portrait modes in creations as they start to give a variation to the projects already. Looks same yet different when kept together.
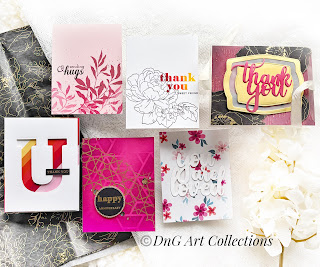
All the card sets for his and hers together:
As there won't be much to explain on whole, I will write descriptions below each set image for clarity and reference:
1. Thank you cards-
How to: Very simple, chose the color palettes as you need. Cut the paper stripes out of those ssme color palettes and then place it on the card base witn glue. Once done, take another white piece of cardstock and cut it with any letter die or word dies (here I have used U). Stick it on top of the base cardtsock with foam tape to give a dimensional look. On top of it, added a heat embossed sentiment. It is placement of this small sentiment, that completes the final look.
Die: Mega alphabet die letter U
Others: Gold embossing powder, Color paler stripes (cut using the trimmer), Altenew foam tape
2. Sentiment ink blending-Stamp set: Altenew craft a flower Rosa Gallica
Ink colors: Ultraviolet, Sapphire, Starlight, Just green, Olive and Maple yellow, Snapdragon, Burnt Red, Vineyard Berry, Velvet
Others: Black dye crisp ink
How to: This might be one of my favorites from the whole set as they carry bright and bold colors which are kind of my liking most of the time. Hence I included them to give a dn showcase a variation of the color play with these sets.
Die: Halftone circle nesting die
Stamp: Moroccon Mosaic Stamp set, Sentiment from Rosa Gallica stamp
Stencil: Color block triangle stencil
Ink Colors: Desert night and Cosmic berry
Others: Gold embossing powder, Gold glitter cardstock, Navy blue cardstock, Light pink cardstock, Altenew double sided adhesive tape
How to: Same concept like the previous one to use the colored cardstock as the base to begin with, but this time, rather than coloring the base, chose the base as the base layer of the stamped coloring image and go forward with darker shades of the leaves on top ot. This helps to craete a light shadow and halo effect already with the use of the colored cardbase. On top of it, I have played with leaves stamp set in various blue and pink shades to give them depth.
Stamp: Just leaves, scripty sentiment stamp
Ink Colors: Desert night and Cosmic berry family
Others: black spaltters and black crisp dye ink
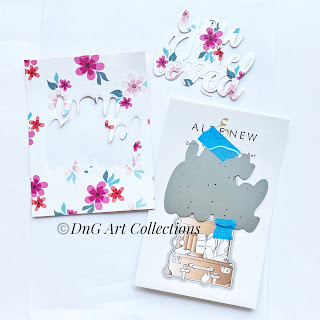
How to: On one of the cards, I have used a very small floral stamp set from the minis set of altenew and on another, I have used similar pattern paper from one of the altenew paper pack families. I wanted to showcase the versatility of each small stamp set and also how the pattern papewrs come into play if you have keen eyes. Rest rthe cards were very simple as I tried to use eclipse technique with the sentiments and on one of them, I tried to used colored cardstock as the base but elevated the sentiment panel with foam tape.
Die: Mega hello, you are so loved die
Stamp: Mini floral stamp set
Ink Colors: Blue color family
Others: Altenew double sided foam adhesive tape
Here, there are some in-progress shots of few of the creations (Just some inside looks of the projects)
Final images of all the cards together:
This concludes all my efforts for the Level 1 learnings in the steps of Altenew certified educator journey. I wish and hope the same efforts and progress for all of you who are already progressing or planning too, to be on this journey. I have progressed and learned something and to top it all, it was a fair chance for all the products which I had always bought and hardly used or never used to put to some good use. Another win/win is now I have lot of cards to already send to my near and dear ones.
I must say, there is lot of discipline onvolded in all these classes and also with every assignment a sense of fullfillment and achievement. The joy of creating and fun of crafting have come together for me after a long time.
Concluding this post with happy thoughts and crossing my fingers for this final tests result and to reach soon Level 2.
Thanks.
Regards
Disha


5 Comments
Both sets are fantastic! Nicely done Disha!
ReplyDeleteThank you for the love :) Since your name is coming as anonymous, I don't know who you are to address as :)
DeleteNo worries, I don’t know why google did not take my profile 🫣my aologies. This is Liz Ortiz🤗 your fellow AECP participant.once again fabulous sets!
DeleteMany thanks again Liz for taking time out and coming here and say such nice words :) Means a lot :)
DeleteDisha, your cards look exceptional!! LOVE both the sets! Well done!!
ReplyDelete